
Table of contents
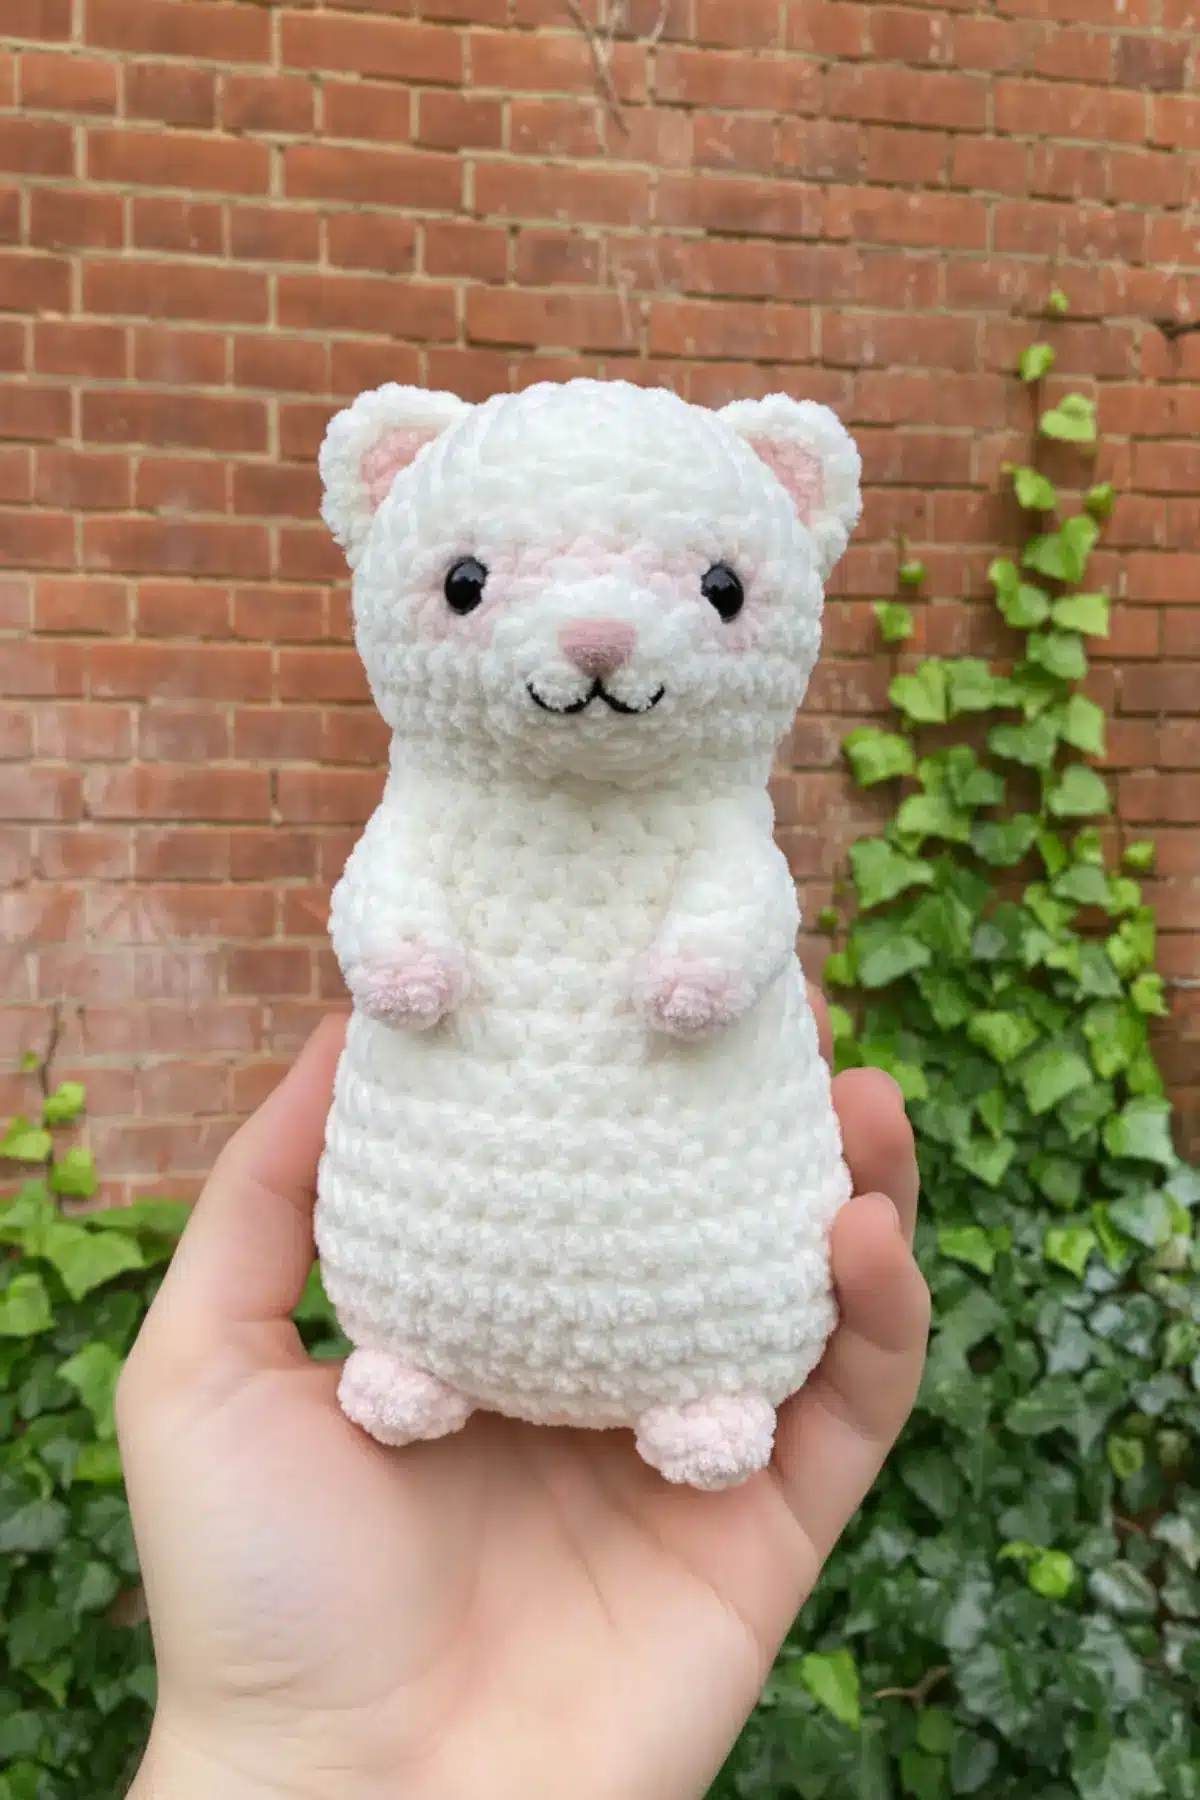
Imagine crafting the most irresistibly soft and cuddly companion, a plush friend that stands tall and greets you with the sweetest expression! This Free Easy Amigurumi Plush Ferret Pattern is your gateway to creating “Snowball,” a velvet-textured friend designed to melt hearts. Perfect for gifting or keeping as your own squishy buddy, this project utilizes bulky chenille yarn to create a substantial, huggable toy that stands on its own.
Crafted with beginners in mind, this pattern focuses on basic stitches and minimal sewing, allowing you to achieve a professional-looking, store-quality plushie. Get ready to grab your hook and bring this adorable standing ferret to life – it’s an incredibly satisfying make!
Materials List Needed For Ferret Pttern Amigurumi
To begin your ferret-making adventure, gather these essential supplies:
- Yarn A: Super Bulky (Weight 6) Chenille Yarn in Cream/White (approx. 80g). Recommended options include Himalaya Dolphin Baby (80301) or Bernat Blanket.
- Yarn B: Super Bulky (Weight 6) Chenille Yarn in Soft Pink (approx. 10g).
- Hook: 4.0mm or 4.5mm (we recommend using a smaller hook than the yarn label suggests to ensure tight stitches and prevent stuffing from showing through).
- Eyes: 12mm Black Safety Eyes.
- Nose: 15mm Pink Safety Nose (triangular) OR pink yarn for embroidery.
- Tools: Tapestry needle (with a large eye for chunky yarn), Stitch marker, Polyfill stuffing, Scissors.
- Optional: Pink fabric pastel or blush for eye shading (for that extra touch of cuteness!).
Finished Size
Your finished standing ferret will measure approximately 20cm (8 inches) tall, a perfect size for cuddles and display.
Stitch Guide (US Terms)
Familiarize yourself with these common crochet abbreviations:
- MR: Magic Ring (or Chain 2, then work stitches into the 2nd chain from hook – this method can be easier for chenille yarn).
- sc: Single Crochet.
- inc: Increase (work 2 single crochets in one stitch).
- dec: Invisible Decrease (single crochet 2 stitches together).
- ch: Chain.
- sl st: Slip Stitch.
- (…) x N: Repeat the instruction inside the parentheses N times.
- […]: Indicates the total stitch count at the end of the round.
Step-by-Step Instructions
Let’s get started on creating your plush ferret! We’ll work the head and body in one continuous piece for a seamless finish.
HEAD & BODY
Worked in one continuous piece from top to bottom.
- R1: With White, 6 sc in MR. [6]
- R2: (inc) x 6. [12]
- R3: (1 sc, inc) x 6. [18]
- R4: (2 sc, inc) x 6. [24]
- R5: (3 sc, inc) x 6. [30]
- R6-10: Sc in each st around (5 rounds). [30]
- Note: Insert Safety Eyes between R8 and R9, about 5 stitches apart.
- R11: (3 sc, dec) x 6. [24]
- R12: (2 sc, dec) x 6. [18] (Neck definition)
- R13: (2 sc, inc) x 6. [24]
- R14: Sc in each st around. [24]
- R15: (3 sc, inc) x 6. [30]
- R16-20: Sc in each st around (5 rounds). [30]
- R21: (4 sc, inc) x 6. [36] (Widening hips for standing stability)
- R22-24: Sc in each st around. [36]
- Start stuffing the head and neck firmly.
- R25: (4 sc, dec) x 6. [30]
- R26: (3 sc, dec) x 6. [24]
- R27: (2 sc, dec) x 6. [18]
- Finish stuffing body firmly, especially the bottom to ensure it stands flat.
- R28: (1 sc, dec) x 6. [12]
- R29: (dec) x 6. [6]
- Fasten off, weave tail through front loops to close hole.
SNOUT (Muzzle)
R1: With White, 6 sc in MR. [6]
R2: (1 sc, inc) x 3. [9]
R3: Sc in each st around. [9]
Fasten off, leaving a tail for sewing. Place pink safety nose in the center of the snout before stuffing lightly and sewing to the face (centered between eyes).
EARS (Make 2)
R1: With White, 6 sc in MR. [6]
R2: (inc) x 6. [12]
Do not stuff. Fold in half and crochet 1 row of sc across the bottom to close. Fasten off. Sew to top of head at R4/5.
Tip: For extra detail, use a small piece of pink felt or embroidery inside the ear for a charming touch, mimicking the reference image.
ARMS (Make 2)
R1: With Pink, 5 sc in MR. [5]
R2: Sc in each st around. [5]
Change color to White.
R3-6: Sc in each st around. [5]
Stuff only the tip lightly. Pinch opening flat and sew to body at R14.
FEET (Make 2)
R1: With Pink, 6 sc in MR. [6]
R2: (1 sc, inc) x 3. [9]
Change color to White.
R3-4: Sc in each st around. [9]
Stuff firmly. Sew to the bottom front of the body (R23-25) to act as stabilizers for standing.
TAIL
R1: With White, 4 sc in MR. [4]
R2: (inc, 1 sc) x 2. [6]
R3: (inc, 2 sc) x 2. [8]
R4-8: Sc in each st around. [8]
Stuff lightly. Sew to lower back of body.

Assembly & Finishing
These final touches will bring your ferret to life!
- Face Sculpting: Using a strand of white yarn, insert your tapestry needle at the base of the neck and bring it out at the inner corner of the left eye. Re-insert the needle at the outer corner of the left eye and exit back at the base of the neck. Pull slightly to create a gentle indentation around the eye. Repeat this process for the right eye to give your ferret a sweet, defined look.
- Mouth: With a thin strand of black yarn or embroidery floss, stitch a small