Table of contents
- Materials for the Amigurumi Puppy Pattern
- Amigurumi Puppy Pattern Notes
- Amigurumi Puppy Head Instructions
- Amigurumi Puppy Front Paws (Make 2)
- Amigurumi Puppy Back Paws
- Amigurumi Puppy Body Instructions
- Amigurumi Puppy Tail Pattern
- Amigurumi Puppy Pattern Assembly Guide
- Amigurumi Puppy Pattern FAQ
- You’ll Love Also This
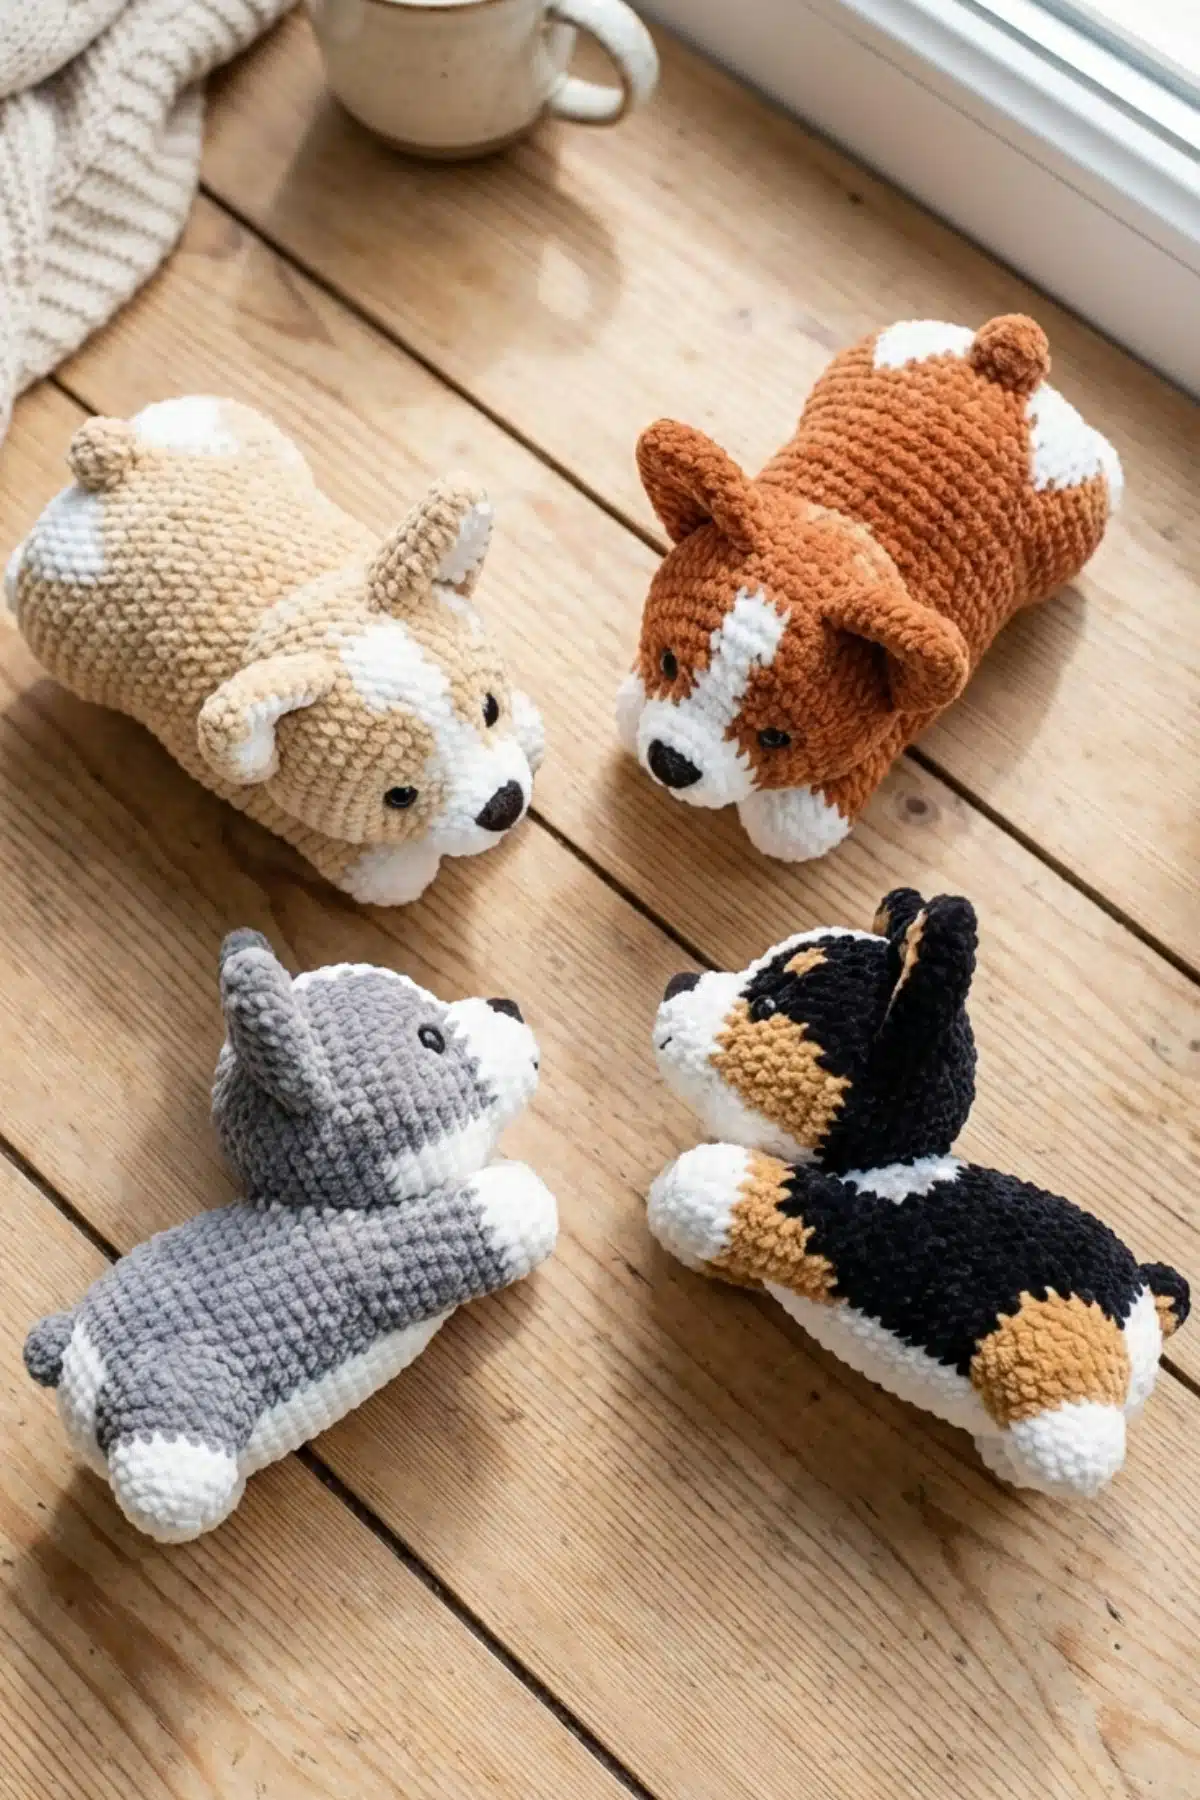
Looking for a free amigurumi puppy pattern to crochet your own adorable dog toy? This step-by-step amigurumi puppy pattern will guide you through creating a sweet two-toned crochet puppy with cute paws, floppy tail, and expressive safety eyes. Whether you’re making a handmade gift or adding to your amigurumi collection, this crochet puppy pattern is perfect for all skill levels.
Materials for the Amigurumi Puppy Pattern
- Beige yarn (weight not specified, usually DK or Worsted for amigurumi)
- White yarn (weight not specified, usually DK or Worsted for amigurumi)
- Crochet hook (size suitable for your chosen yarn, typically 2.5mm-3.5mm for amigurumi)
- Fiberfill for stuffing
- Safety eyes (size not specified, common sizes are 6mm-12mm)
- Yarn needle for sewing and weaving in ends
- Scissors
Amigurumi Puppy Pattern Notes
- This pattern uses standard US crochet terms.
- Work in continuous rounds unless otherwise specified.
- Stitch counts are indicated in parentheses
()at the end of each round/row. - Stuff components firmly as you go, especially the head and body.
- Color changes are indicated in the pattern.
Amigurumi Puppy Head Instructions
Follow this step in the amigurumi puppy pattern to shape the head perfectly.
- Begins with white yarn.
- Ch 5, start in second chain from the hook. Working on both sides of a chain (working on a foundation chain [ch 20]).
- Rnd 1: 3 sc, 3 sc in the last stitch, continue the other side of the foundation chain, 4 sc (10).
- Rnd 2: 1 inc, 2 sc, 3 inc, 2 sc, 2 inc (18).
- Rnd 3: 2 sc, 1 inc, 2 sc, 3 inc, 2 sc, 1 inc (24).
- Rnd 4: 24 sc (24).
- Change to beige yarn.
- Rnd 5: 24 sc (24).
- Rnd 6: 24 sc (24).
- Rnd 7: (3 sc, dec) x 6 (20).
- Rnd 8: (2 sc, dec) x 6 (16).
- Insert the safety eyes between round 7 and 8, the distance between 2 eyes is 10 sts (Rnd 4). Skip the 7 stitches from the beginning, attach the first eye.
- Rnd 9: (1 sc, dec) x 6 (12).
- Rnd 10: (dec) x 6 (6).
- Fasten off and leave a long tail for sewing.
- Weave in ends.
- Stuff the head tightly with fiberfill.
Amigurumi Puppy Front Paws (Make 2)
Repeat the instructions to complete both front paws in your amigurumi puppy pattern.
- To make the front paws, divide the work, identifying 1 stitch for the central space between the paws, 1 stitch for the back and 20 stitches for each paw.
- Rnd 1-R4: 20 sc (4 rounds) (20)
- Rnd 5: 20 sc (20)
- Rnd 6: (2 sc, dec) x 6 (24)
- Rnd 7: 24 sc (24)
- Rnd 8-R10: 24 sc (3 rounds) (24)
- Change to white yarn.
- Rnd 11: (1 sc, dec) x 6 (18)
- Rnd 12: 18 sc (18)
- Rnd 13: (dec) x 6 (12)
- Stuff the paws lightly with fiberfill.
- Fasten off and leave a long tail for sewing.
- Fasten off and leave a long tail for sewing. Bring the ending yarn to sew the open side of the paw together (or weave the yarn tail through the front loops of the last round and pull it tight to close the hole).
Amigurumi Puppy Back Paws
The back paws are worked individually at first, with a slight variation in the shaping for the right and left paw. Crucially, the left back paw is not fastened off, as it will be joined directly to form the body.
Right Back Paw
- Begin with white yarn.
- Ch 6, start in second chain from the hook. Working on both sides of a chain.
- Rnd 1: 1 inc, 3 sc, 3 sc into the last stitch, continue the other side of the foundation chain, 4 sc (12)
- Rnd 2: 2 inc, 3 sc, 3 inc, 3 sc, 1 inc (18)
- Rnd 3: (2 sc, inc) x 2 times, 3 sc, (2 sc, inc) x 3 times, 4 sc, inc (24)
- Rnd 4: 24 sc (24)
- Change to beige yarn.
- Rnd 5: 24 sc (24)
- Rnd 6: (3 sc, dec) x 6 (22)
- Rnd 7: (dec) x 10, 2 sc (20)
- Rnd 8: (1 sc, dec) x 6, (dec) x 2 (18)
- Rnd 9: (1 sc, dec) x 6 (12)
- Fasten off and weave in ends.
Left Back Paw
- Do the same as the right paw until round 7 but DO NOT cut the yarn.
- Join the paws together to make the body.
Amigurumi Puppy Body Instructions
This step helps your amigurumi puppy pattern form a firm, huggable body.
- Rnd 8: 10 sc on left paw, chain 4, 20 sc around right paw, 4 sc on back hump of the chain between 2 paws, 10 sc on left paw (45)
- Rnd 9: (8 sc, inc) x 5 (50)
- Rnd 10: (9 sc, inc) x 5 (55)
- Rnd 11: (10 sc, inc) x 5 (60)
- Rnd 12-R14: 60 sc (3 rounds) (60)
- Rnd 15: (8 sc, dec) x 6 (54)
- Rnd 16: (7 sc, dec) x 6 (48)
- Rnd 17: (6 sc, dec) x 6 (42)
- Rnd 18: (5 sc, dec) x 6 (36)
- Rnd 19: (4 sc, dec) x 6 (30)
- Rnd 20: (3 sc, dec) x 6 (24)
- Rnd 21: (2 sc, dec) x 6 (18)
- Rnd 22: (1 sc, dec) x 6 (12)
- Rnd 23: (dec) x 6 (6)
- Stuff the body tightly with fiberfill.
- Fasten off and leave a long tail for sewing.
- Weave in ends.
Amigurumi Puppy Tail Pattern
Attach the tail according to the amigurumi puppy pattern instructions
- Begins with beige yarn.
- R1: 6 sc in MR (6)
- R2: 6 inc (12)
- R3: (1 sc, inc) x 6 (18)
- R4-R6: 18 sc (3 rounds) (18)
- Stuff the paw lightly with fiberfill.
- Fasten off and leave a long tail for sewing.
Amigurumi Puppy Pattern Assembly Guide
Bringing all the pieces together is the most exciting part, as your puppy truly comes to life! Take your time with these sewing steps to ensure a neat and sturdy finish.
- Sew the head and body. Make sure the head is sewn between 2 rows to 9 sc.
- Sew the head (R2) on the body (Rnd 24).
- Sew the tail on the body between Rnd 13-16.

Amigurumi Puppy Pattern FAQ
For amigurumi projects like this puppy, a smooth worsted weight (or DK weight) acrylic or cotton yarn is generally recommended. This type of yarn helps define stitches clearly and creates a sturdy fabric that holds its shape well when stuffed.
To achieve neat color changes, work the last yarn over of the stitch *before* the color change with the new color. For example, when making a single crochet, insert your hook, yarn over with the old color, pull up a loop, then yarn over with the *new* color and pull through both loops on the hook. This blends the transition smoothly.
Stuff your amigurumi firmly and evenly with fiberfill, using small pieces at a time. A chopstick or the back of a crochet hook can help push stuffing into tight spots. Overstuffing can cause gaps between stitches, while understuffing can make the piece floppy. Aim for a firm, but not bulging, consistency.
Yes, you can adjust the size by using a different weight of yarn and a corresponding hook size. Using a thicker yarn and larger hook will result in a bigger puppy, while a thinner yarn and smaller hook will create a miniature version. Just be sure to check your gauge if you want a specific outcome.
Congratulations, you’ve just brought an adorable little puppy to life with your own hands! Each stitch tells a story of patience and creativity, and the finished project is a testament to your growing skills as a maker. Whether this puppy finds a home on a shelf, in a child’s arms, or as a thoughtful gift, it carries the unique warmth of a handmade treasure. Keep crafting, keep exploring, and enjoy every moment of your creative journey!