
This plush duck amigurumi pattern is designed for beginners and uses soft plush yarn to create a cuddly and adorable crochet duck.
Table of contents
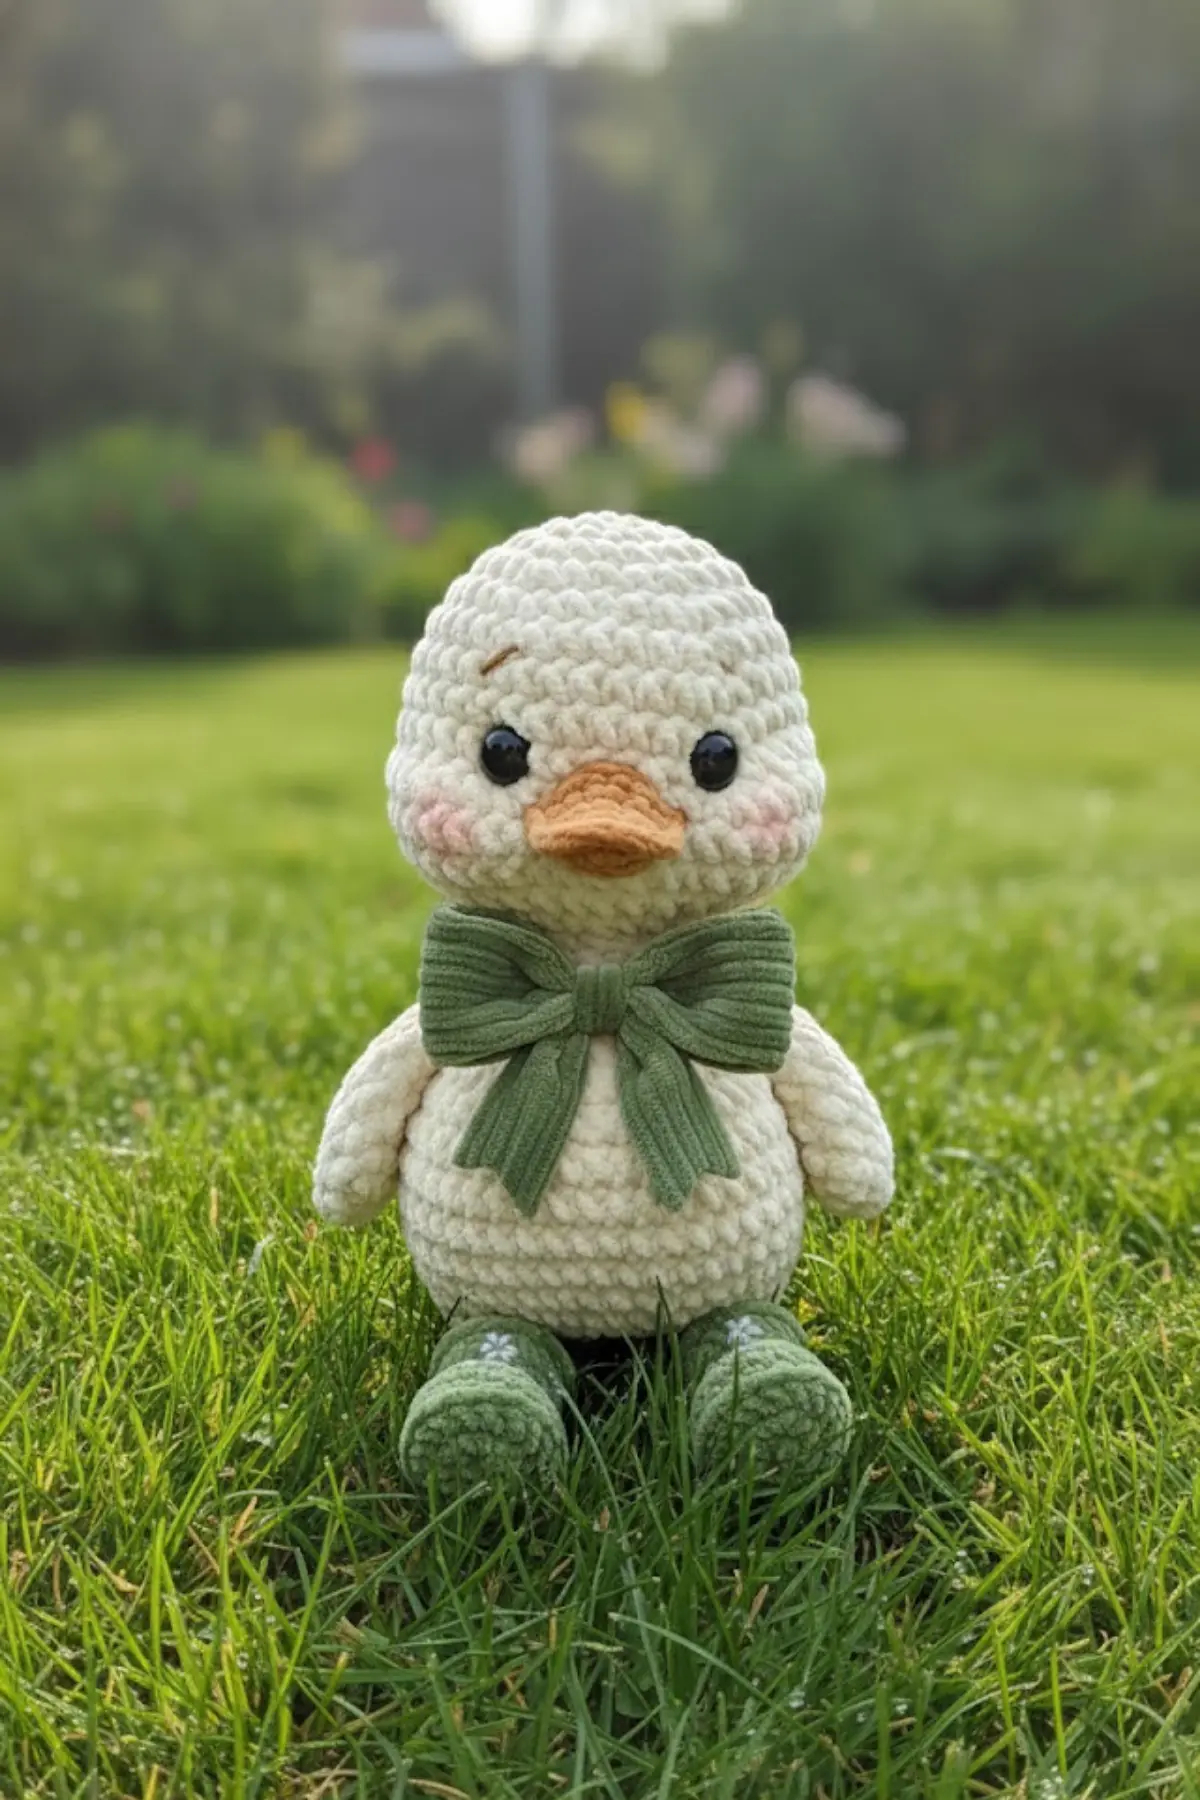
Imagine a cozy afternoon, a soft ball of yarn in your hands, and the joy of watching a sweet, huggable plush duck come to life stitch by stitch. This delightful amigurumi pattern is perfect for creating a charming companion for a little one, a thoughtful handmade gift, or simply adding a touch of whimsical cuteness to your own space. With its soft textures and endearing details, this little duck promises to be a cherished creation for any maker.
At a finished height of approximately 7 inches, this plush duck is designed to be the perfect snuggle size. Its oversized head, plump body, and adorable little boots give it an irresistibly cute character that’s sure to bring a smile.
Materials for Plush Duck Amigurumi Pattern
- Plush Yarn (Super Bulky / Category 6):
- Cream (main body & head) – e.g., Himalaya Dolphin Baby – 80301 Cream, YarnArt Dolce – 741 Cream
- Light Orange (beak & feet) – e.g., Dolphin Baby 80309 Light Orange
- Sage Green (bow & boots) – e.g., Dolphin Baby 80318 Mint Green
- Crochet Hook: 4.5 mm – 5 mm (to achieve tight tension)
- Safety Eyes: 10–12 mm (black, glossy)
- Stuffing: Polyester fiberfill
- Stitch Marker
- Tapestry Needle
- Optional: Pink embroidery floss or blush felt for cheeks, White embroidery floss for boot details
Using high-quality plush yarn ensures that this plush duck amigurumi pattern results in a soft, huggable, and durable handmade toy.
Stitch Guide for Duck Amigurumi Crochet
- MR – Magic Ring
- sc – Single Crochet
- inc – Increase (2 sc in one stitch)
- dec – Invisible Decrease
- sl st – Slip Stitch
- ch – Chain
Tip: Count stitches carefully — plush yarn hides stitches.
How to Crochet a Plush Duck Amigurumi
Head – Plush Duck Amigurumi Pattern (Cream)
MR 6
inc x6 (12)
(sc, inc) x6 (18)
(2 sc, inc) x6 (24)
(3 sc, inc) x6 (30)
6– 11. sc around (30)
Insert eyes between rounds 7– 8, 6 stitches apart
(3 sc, dec) x6 (24)
(2 sc, dec) x6 (18)
Stuff firmly
(sc, dec) x6 (12)
dec x6 (6)
Fasten off
Body – Plush Duck Amigurumi Pattern
(Cream)
MR 6
inc x6 (12)
(sc, inc) x6 (18)
(2 sc, inc) x6 (24)
(3 sc, inc) x6 (30)
6– 9. sc around (30)
(3 sc, dec) x6 (24)
(2 sc, dec) x6 (18)
Stuff
(sc, dec) x6 (12)
Fasten off
Wings (Make 2 – Cream)
MR 6
(sc, inc) x3 (9)
3– 4. sc around (9)
Flatten, sew to sides of body
Legs (Make 2 – Light Orange)
MR 6
inc x6 (12)
3– 4. sc around (12)
Lightly stuff
Fasten off
Boots (Make 2 – Sage Green)
MR 6
inc x6 (12)
(sc, inc) x6 (18)
4– 6. sc around (18)
Embroider small white snowflake/ dots
Insert leg and sew closed
Beak (Light Orange)
MR 6
(sc, inc) x3 (9)
sc around (9)
Flatten slightly, sew between eyes
Bow (Sage Green)
Ch 6
5 sc
Rows 2– 8: sc across
Wrap center with yarn, tie and sew around neck
Free Duck Amigurumi Assembly Tips
- Sew head to body
- Attach wings to the sides of the body
- Add blush to the cheeks (optional, using pink embroidery floss or felt)
- Adjust and secure the bow around the duck’s neck and attach the boots with the legs inside.
This plush duck amigurumi pattern is perfect for handmade gifts, nursery decor, or adding a cute crochet animal to your collection

Frequently Asked Questions
For this amigurumi duck, super bulky (Category 6) plush or chenille yarn is recommended. Brands like Himalaya Dolphin Baby or YarnArt Dolce provide that soft, fuzzy texture that makes the duck extra huggable and hides stitches well for a polished finish.
Achieving tight tension is crucial for amigurumi, especially with plush yarn. Using a smaller crochet hook (4.5mm-5mm for super bulky yarn) than typically recommended for the yarn weight helps. Practice consistent single crochet stitches and try to avoid loose loops to keep the fabric dense and prevent fiberfill from peeking through.
Stuff your amigurumi firmly but gradually, adding small amounts of polyester fiberfill at a time and shaping as you go. Ensure there are no lumpy spots and that the piece maintains its intended shape. For the head, stuff extra firmly to prevent it from flopping, and continue adding stuffing until just before you fully close the opening.
Absolutely! Customization is part of the fun of handmade items. For the blush, you can use a small amount of pink embroidery floss to stitch a little